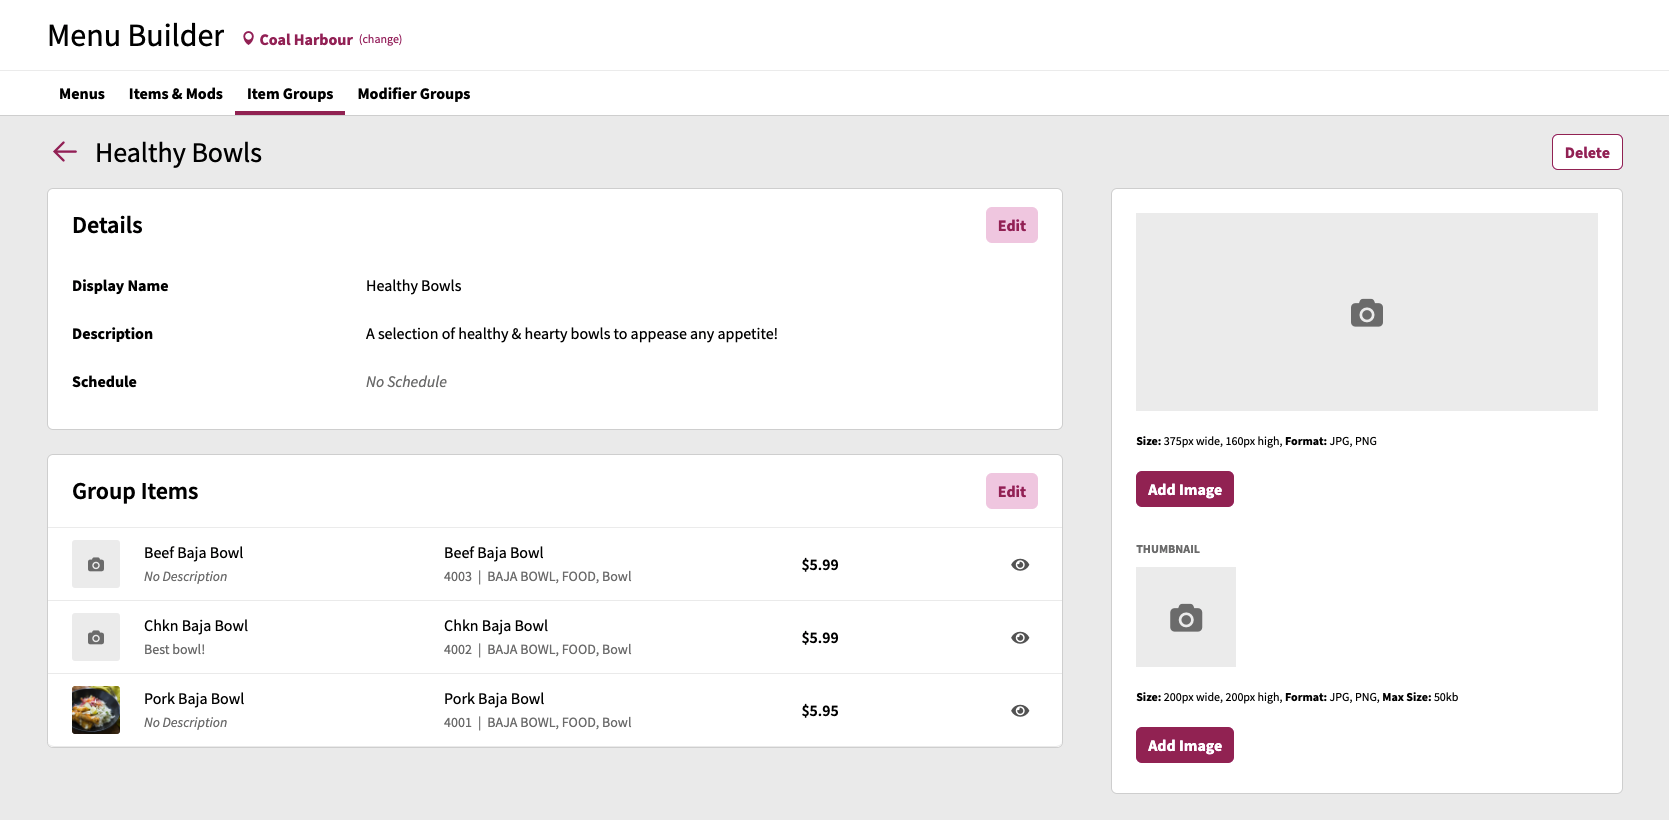
The item group details screen allows you to manage the details of a particular item group. This screen can be accessed by clicking on an existing item group within the Item Groups screen. The item group details screen contains three main sections for configuration: Details, Image Assets, and Group Items.

Item Group Details
The Details section contains basic information about the Item Group:
- Display Name: This is the name of the item group which will show to guests when viewing your menu(s).
- Description: This is a description of the item group which will show to guests when viewing your menu(s).
- Schedule: Setting a schedule for an item group will allow you to control what schedule(s) the item group is visible or not visible during (for more information on creating schedules, please refer to the Schedules documentation).
To edit any of these fields, click Edit in the Details section to reveal the editing mode. Once your necessary changes are complete, click Save Changes to confirm the changes, or click Cancel to undo the changes.
Image Assets
The image assets panel contains two different image asset upload components to add images for your item groups:
- Header Image
- This image is currently not displayed to guests at this time, but an image can be added here and will be displayed to guests at a later date.
- Recommended image size is 375 pixels wide, 180 pixels high
- Recommended image type is either JPG or PNG
- Thumbnail Image
- This image is used in the menu screen (where item group(s) are listed) for your guests
- Recommended image size is 200 pixels wide, 200 pixels high
- Recommended image type is either JPG or PNG
- Image bust be 50kb or less in size
Adding / Updating Image Assets
To add or update a header or thumbnail image, click the Add Image (if no image currently exists) or Change Image button. This will bring up the file browser where you can locate and select the image for upload. Once uploaded the image will appear on screen. Click Save Changes to save the images to the item group, or click Cancel to undo the changes.
Deleting Image Assets
To delete a header or thumbnail image, click the Remove button, then click Save Changes to confirm the removal or click Cancel to undo the removal.
Group Items
The Group Items section allows you to manage the items that are present on the item group. To begin editing the group items, click the Edit in the Group Items section. In edit mode you'll be able to perform the following actions:
Adding Items to Item Group
To add item(s) to the item group, while in edit mode under the Group Items section:
- Click + Add Items
- An Add Menu Items window will appear with a list of items. Items can be searched by using the Search menu items field.
- Click the Add button for any item(s) to be added to the recommended pairings list
- Click the Done button to return to the Item Group details screen
- Click Save Changes at the bottom of the Group Items section to save the changes made
Removing Items to Item Group
To delete an item from the item group, while in edit mode under the Group Items section:
- Click the X icon (
 ) on the item(s) to be removed
 - Click Save Changes at the bottom of the Group Items section to save the changes made
Reordering Items to Item Group
To reorder items in the item group, while in edit mode under the Group Items section:
- Click and drag the item(s) via the grabber icon (
 ) in the new order you wish to set
 - Click Save Changes at the bottom of the Group Items section to save the changes made
Toggling an item as visible/not visible in Item Group
To toggle individual items in the item group as visible or hidden, while in edit mode under the Group Items section:
- Click the eye icon for item(s) to toggle between visible and hidden (visible:
 | hidden:
  )
) - Click Save Changes at the bottom of the Group Items section to save the changes made