New Menu Builder Introduction and Quick Guide
What is the shared menu builder?
Shared menus is our new menu builder. This allows a company that has a consistent menu across all companies to be controlled from a central location.
This new menu builder allows companies to create items and menus at a company level, and assign them to a location. As items and menus can vary between locations, the location specific information can be adjusted, and then when an item or menu is adjusted on the company level, all the changes automatically update to every location!
Our new menu builder uses a new concept of Menu configurations. A configuration contains all the menus (such as a drinks menu, and a dessert menu). This means that a company can have a configuration for each experience they offer (dine-in, take-out, room service).
Required Security Permissions
To access the menu builder, you need the Company Level Menu Builder - Full Access permission. The shared menus builder is company-wide, so any item created in the shared menu will be accessible across the company.

If you created menus before the launch of our new menu builder
All menus previously created were created individually on the location. These menus will now be under the "Location Menus" section.
Quick Guide - How to build a menu and share it across the company
Below are the steps required to create a shared menu. The sections will have a link to a thorough explanation of these processes. This can be used as a quick guide for the process.
We will create the menu in the picture below.
Step 1 : Create your shared modifiers, items, modifier groups, and item groups
We suggest beginning with Modifiers. This is because when you are creating items, you will be able to attach the already created modifiers to items.
We will begin by creating a shared modifier. Navigate to the "Items & Mods" heading. Select "New Shared modifier" and select "New Shared modifier". After inputting the information and saving changes, the item will be created.

After creating an item, a new heading will appear "Assigned Locations" This allows you to assign the modifier to locations. It is advised to assign the items as soon as they are created, to avoid forgetting this step! See Step 2 below for more information on assigning.
For additional guides on how to create shared items, modifiers, modifiers and item groups, refer to the guide links below
Creating a shared modifier group
Step 2 : Assigning items to a location and adjusting the location information
Next we assign an item to the location. Assigning is necessary so that items that are not sold at that location do not appear there. If a shared menu is set on a location without that item assigned, it will not appear on that location's menu.
Assigning can be done immediately after creating a modifier, item or item group, or at a later date.

To assign the item to a location, click on the item in the items/mods list, and when select "Edit Assigned Locations". this will show a list of all locations in the company. There is the option to individually assign locations, or to assign to all locations at once.
Once the item is assigned to a location and the changes are saved, the item will appear in the assigned locations list.
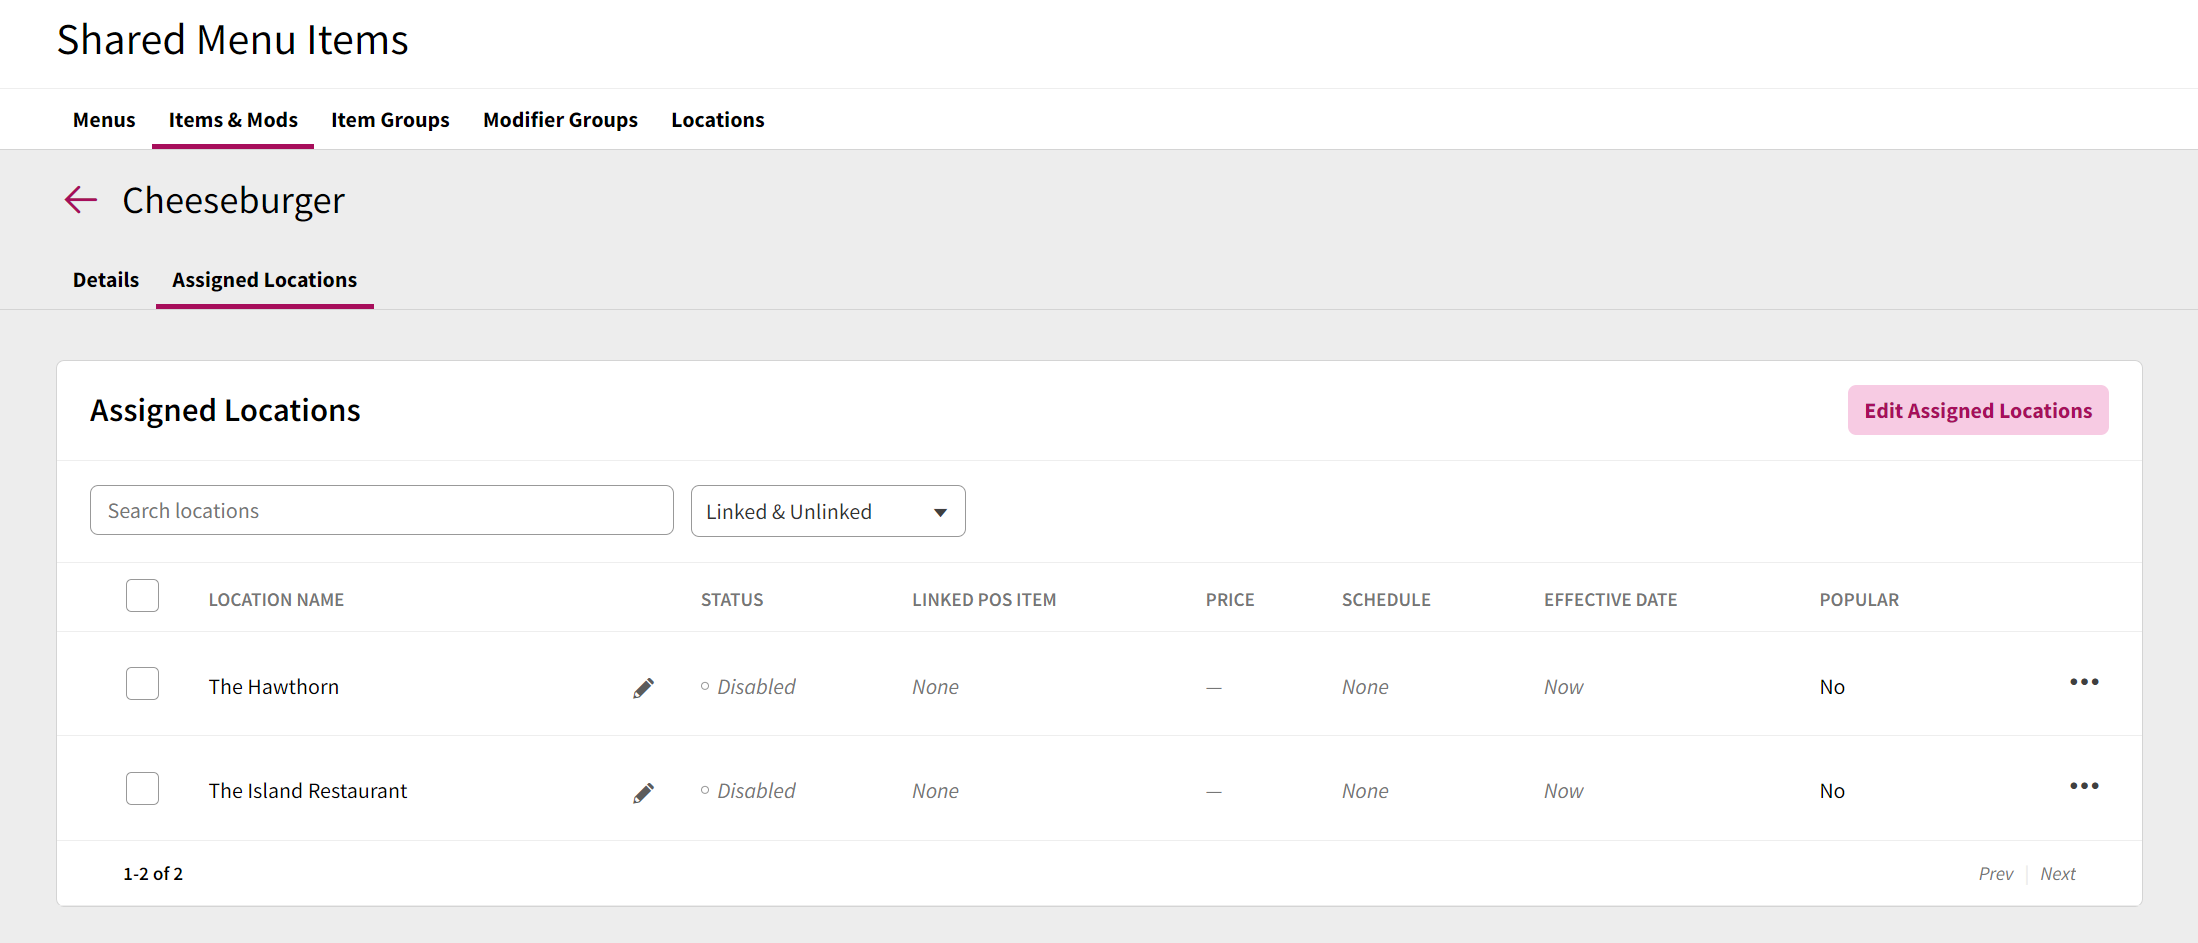
The items are shown with the location-specific information. For items, the status, Linked POS item, Price, Schedule, Effective date and Popular fields are configured on the location.
To adjust location specific fields, click the pencil icon on the right of the location name. This will load a box where the fields can be adjusted
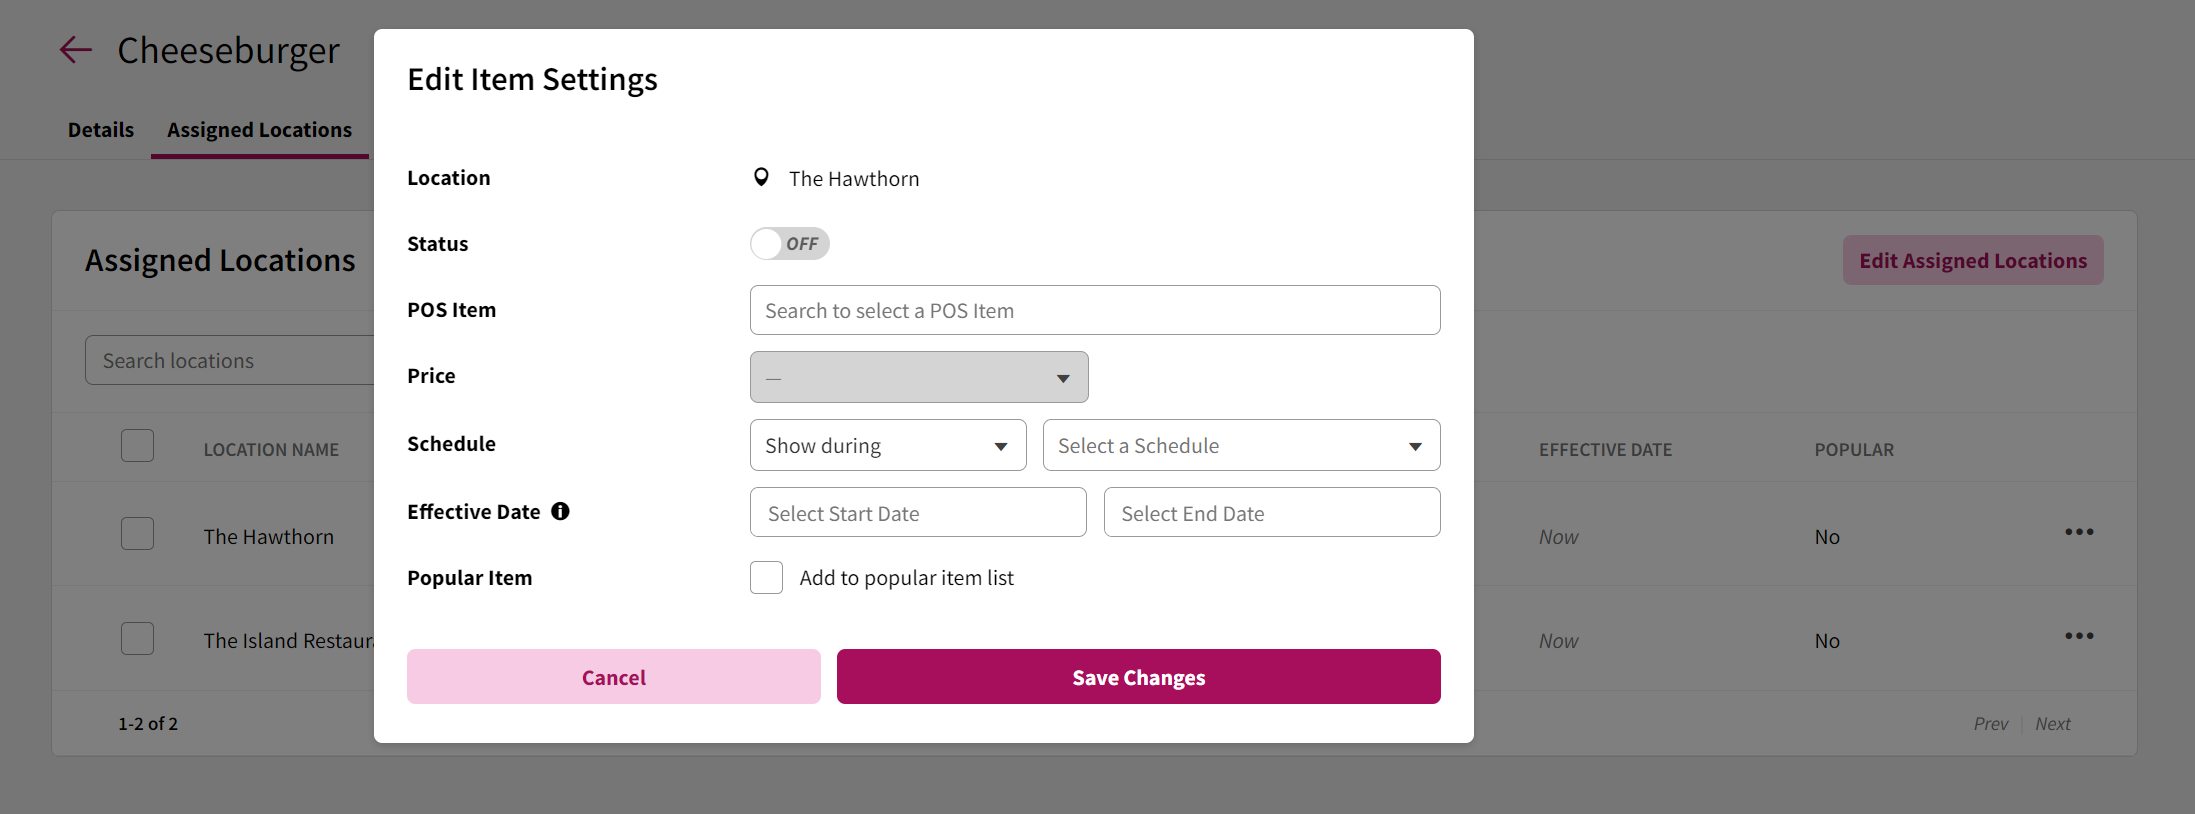
The item is now created, assigned to the location, and has all of its location-specific information updated. Any further changes on the company level (such as name and photo) will now apply to all the assigned locations.
For additional guides on how to assign shared items, modifiers, modifiers and item groups, refer to the guide links below. This includes information on editing the location specific information
Modifier group automatic assigning
Now that we have created our items, assigned them to a location and added their location information, we are now ready to create the menu!
Step 3 : Creating a shared menu configuration with shared items
Navigate to the "Menus" heading of the Shared Menu screen. Create a new configuration by pressing "+New Configuration". This will allow you to set a Name for the configuration. This will contain all the menus for a shared menu setup.

Once a configuration is added, menus and item galleries can now be added. Each menu or item gallery can have a unique name and description.
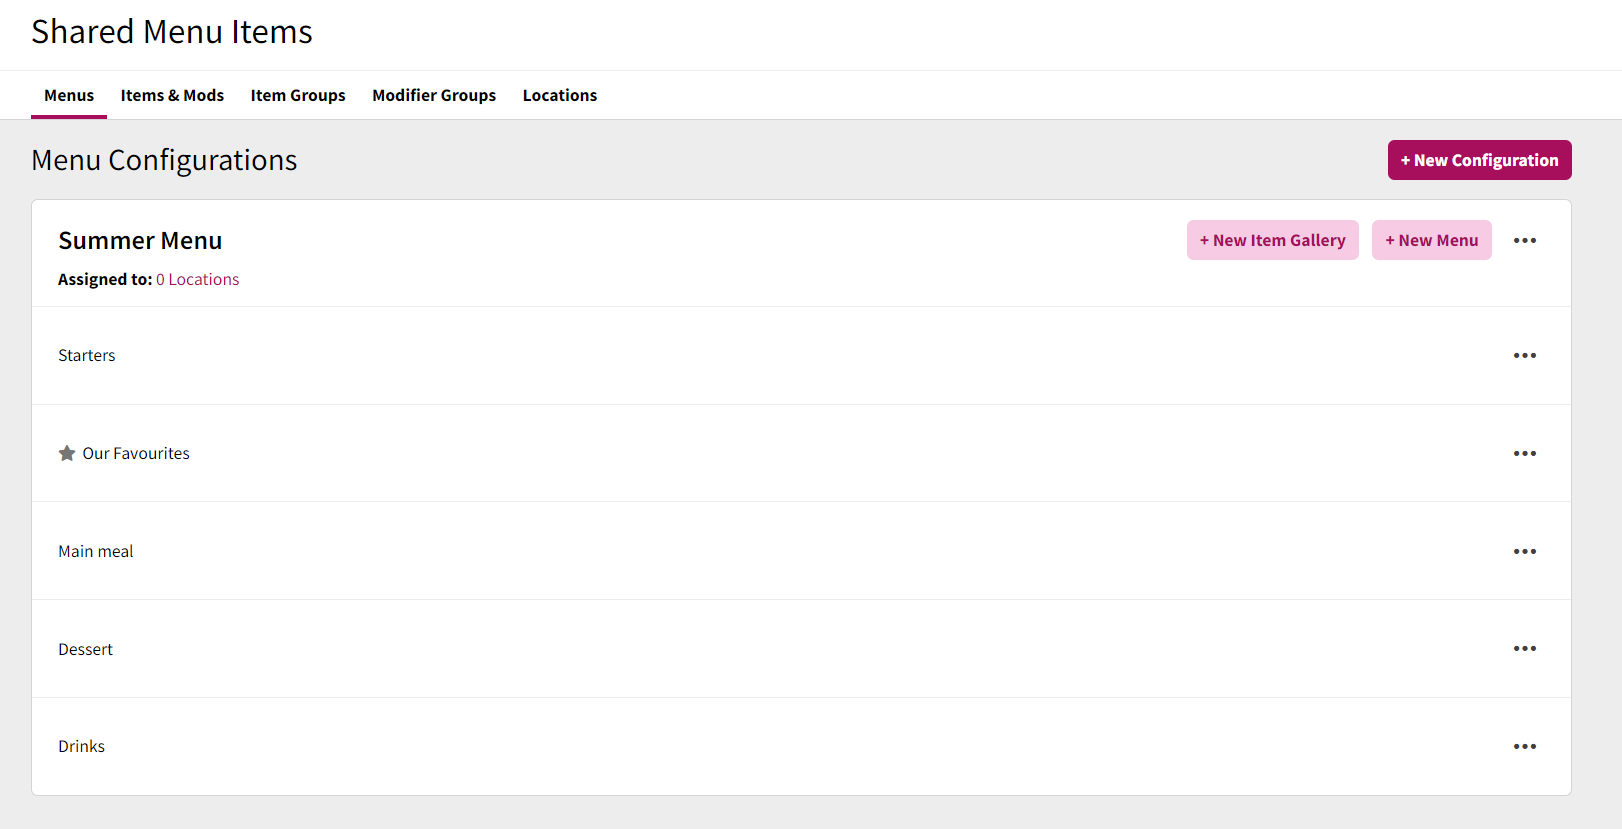
Once menus are created, navigating into each menu allows sections to be made in the menus.
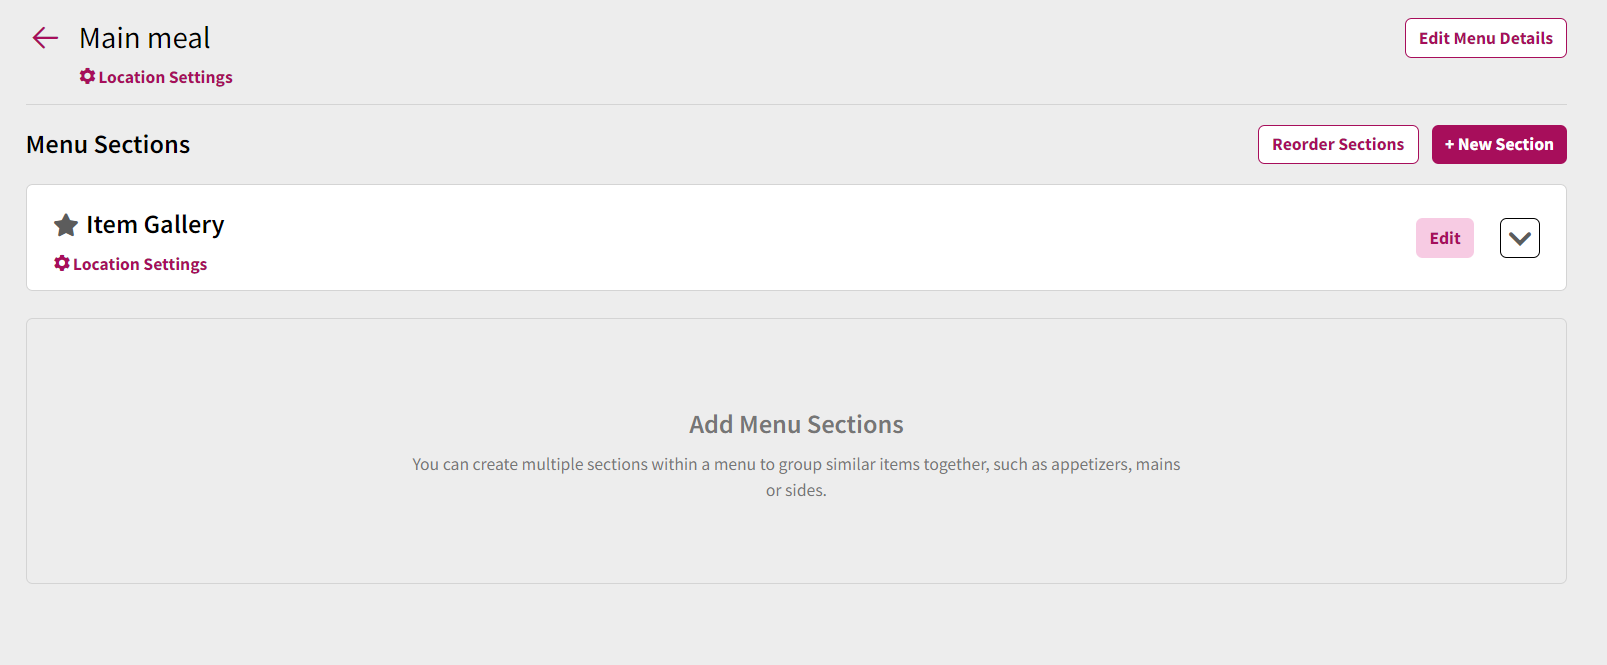
We created a menu "Main meal" and added in a "burgers" section with a cheeseburger.
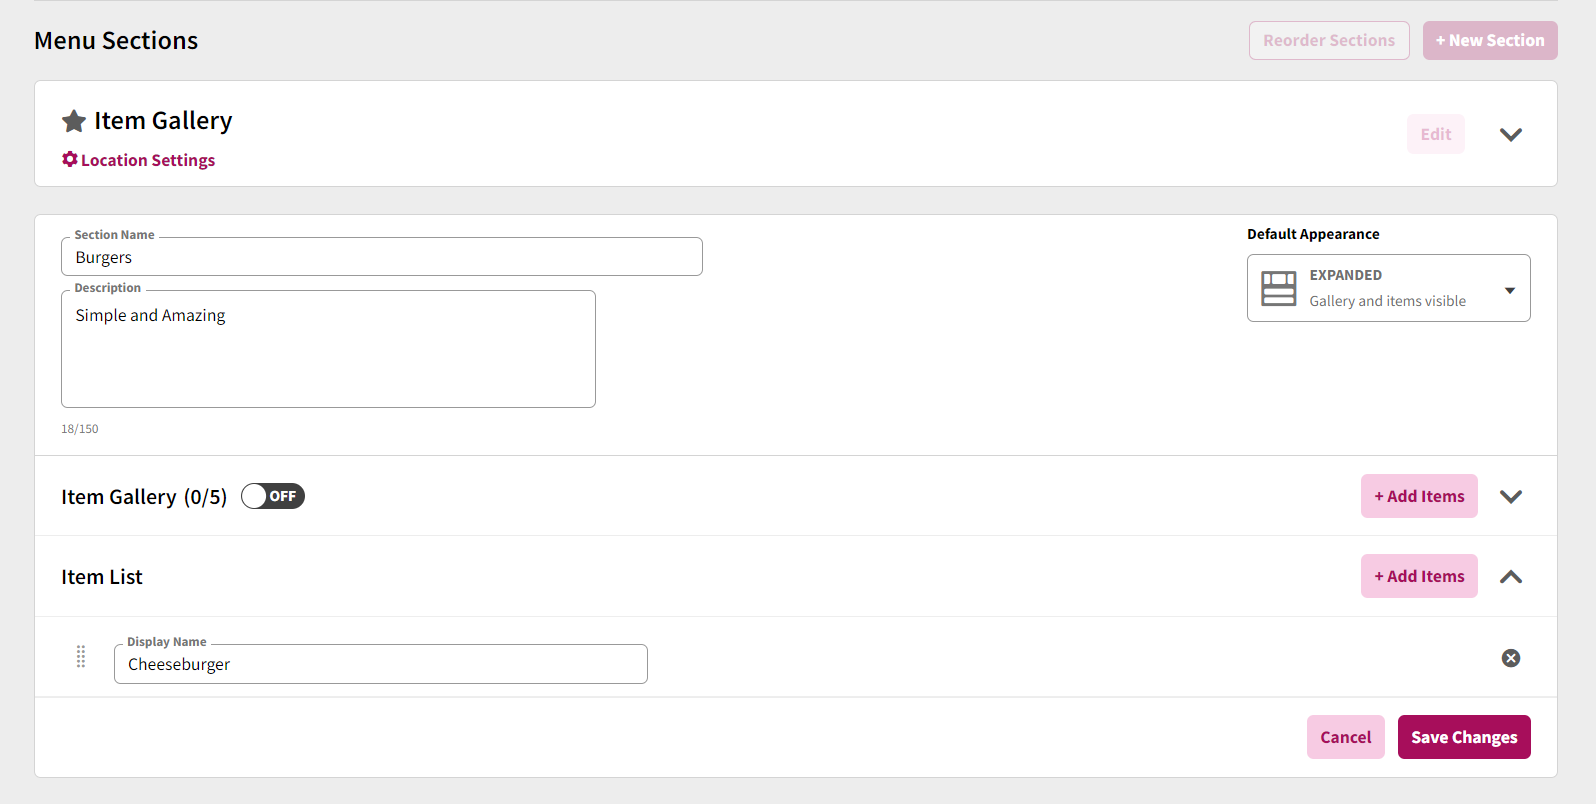
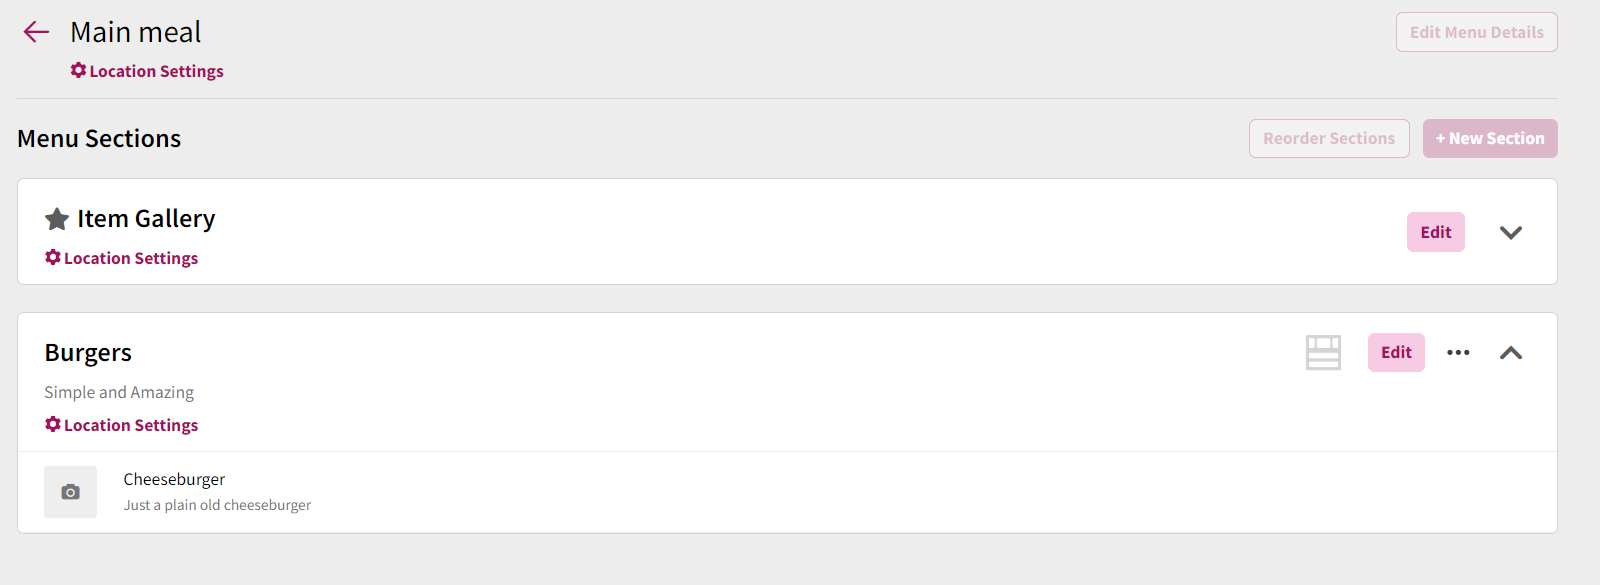
After saving, there is now the burgers section, with our cheeseburger.
We have now created a shared menu configuration with 4 menus (Starters, Mains, Desserts, Drinks), with shared items in them. We are now ready to prepare these menus at the locations.
For more information on shared menu and shared item gallery setup, see the following guides
Step 4 : Assigning shared menu configurations and adjusting location information
To be able to adjust location information, a menu configurations needs to be assigned to a location. This is so that locations that do not offer a specific menu are not filled with redundant menus.
When a menu configuration is assigned, it is not live. This gives time for a location to set up location information, and get ready for go-live. This is so that a company can pre-prepare for going live with a new menu in advance.
To assign a configuration, navigate to the menu configuration screen.
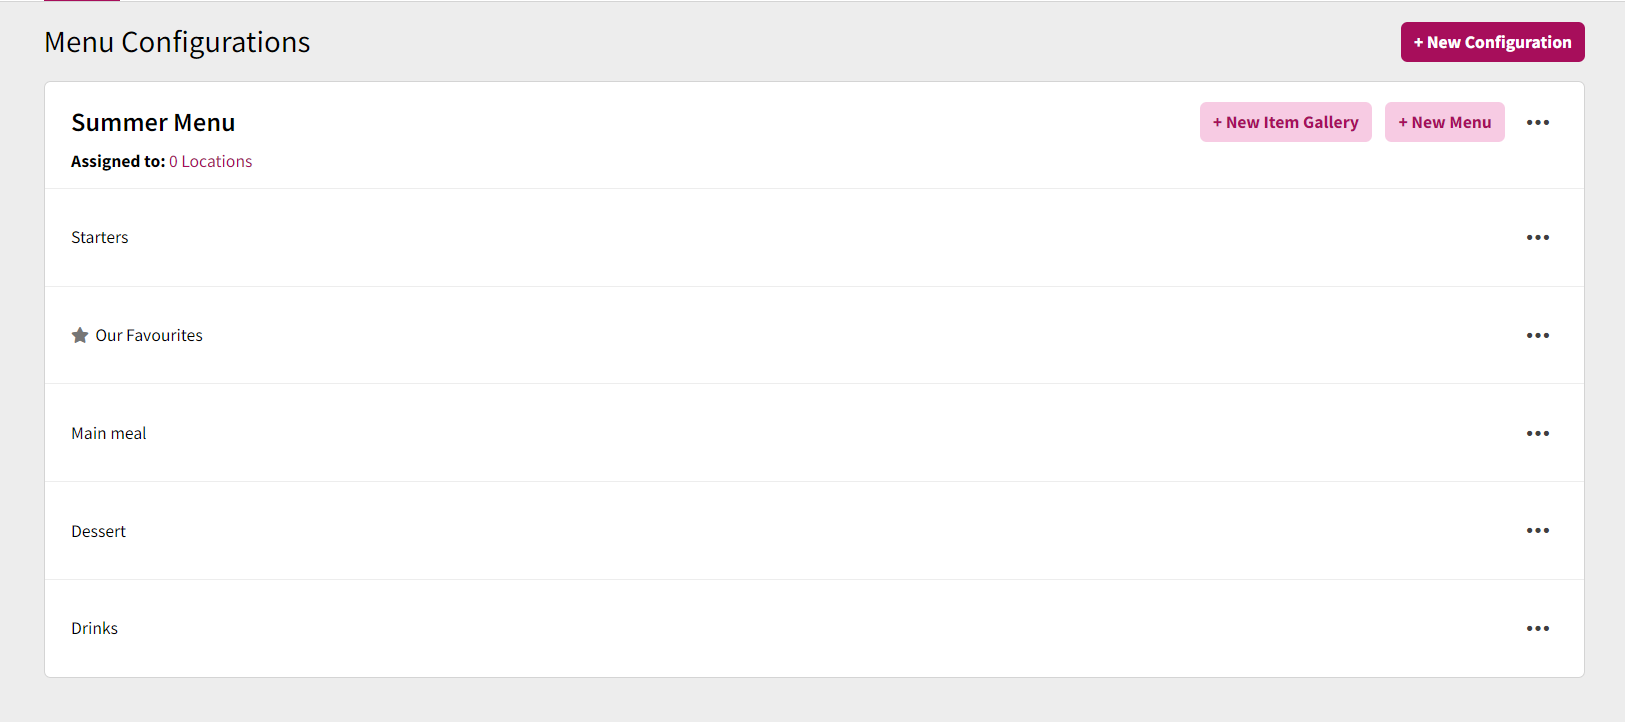
Select the number of locations next to "Assigned To" to load the assignment window. Assign the menu configuration to the desired locations and Save Changes
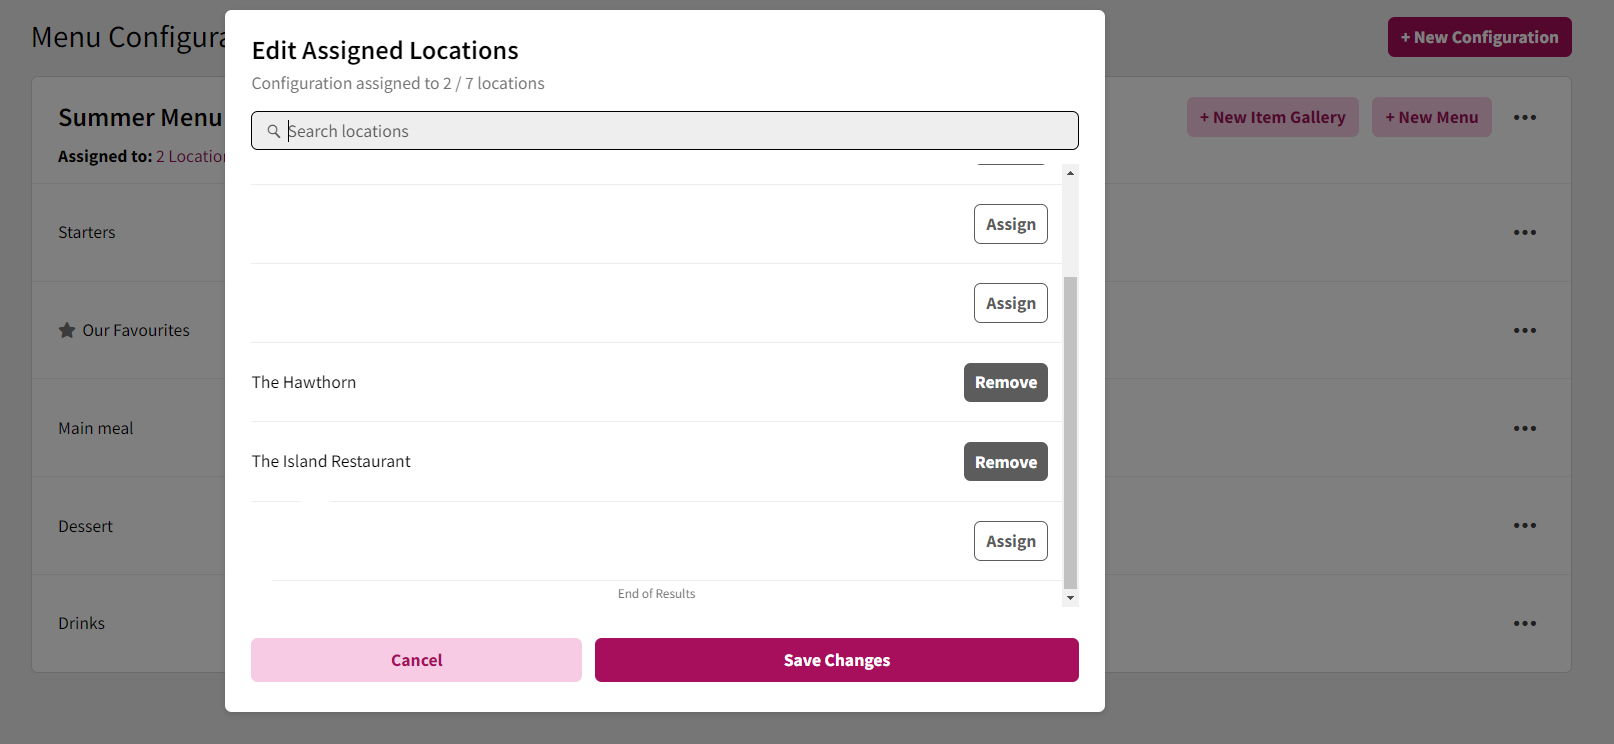
Now that the menu is assigned to a location, the location specific information can be edited.

Clicking on a "Location Settings" button now shows a list of assigned locations. To edit a single location, select the pencil icon on the right hand side of the location name. To edit multiple locations, select the box on the left side of the location name for all locations and "Edit Selected"
Note: All menus are enabled on locations by default. This step is only required if a specific menu in a group does not apply to a specific location.
The following fields can be edited for locations on a shared menu:
Item Gallery and Gallery inside menu
Status
Menu and Menu section
Status and Schedule
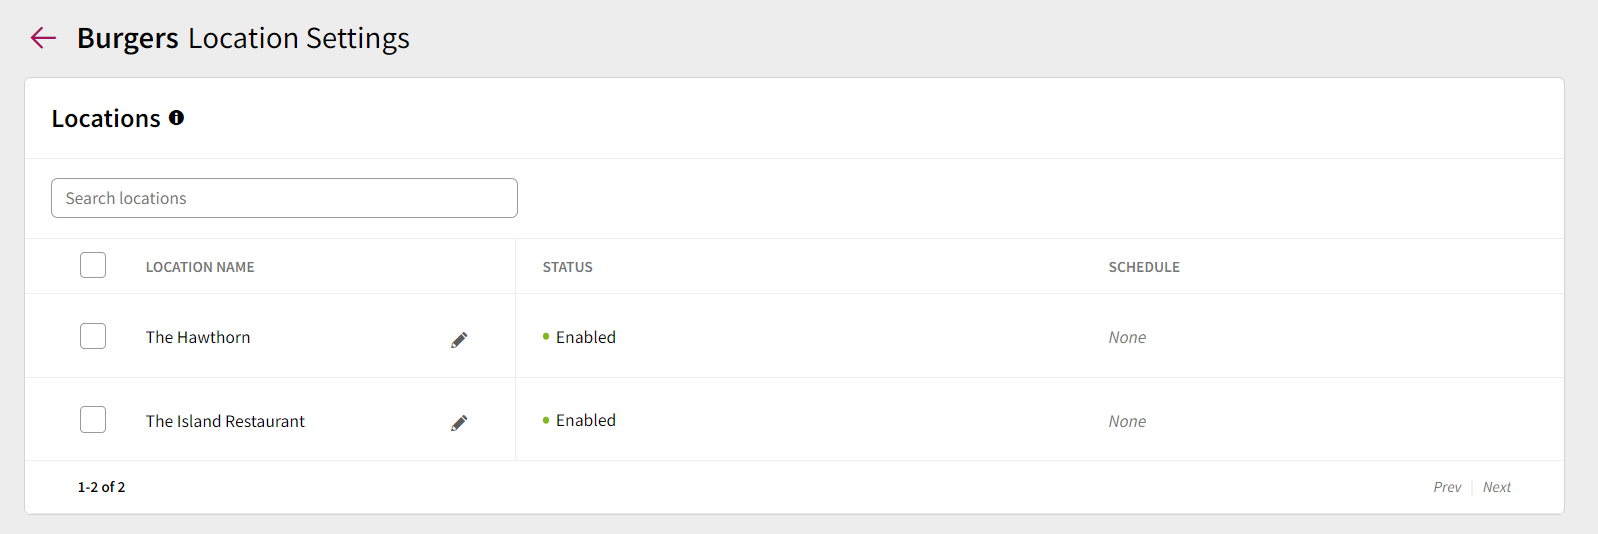
Once the location information is updated for locations, the menu is ready to go live!
Step 5 : Going live in Shared Menus
Before going live, it is good practice to make sure steps are complete.
Menu items are created, assigned, and location information (such as POS) have been set
Menu is created, assigned and location information has been adjusted.
For a final check, it is possible to go to a location and preview the menu. Navigate to the "Menu builder" heading on the left hand bar, and select the specific location. If a menu has been assigned, it is possible to navigate to this menu.
From this menu it is also possible to adjust location information such as menu, status, and also menu items will have a visibility tool "Eyeball icon" that allows quick removal of an item from a location menu.
When confident to go live with the new menu, navigate to the shared menus area, and to the "Locations" tab on the top bar.
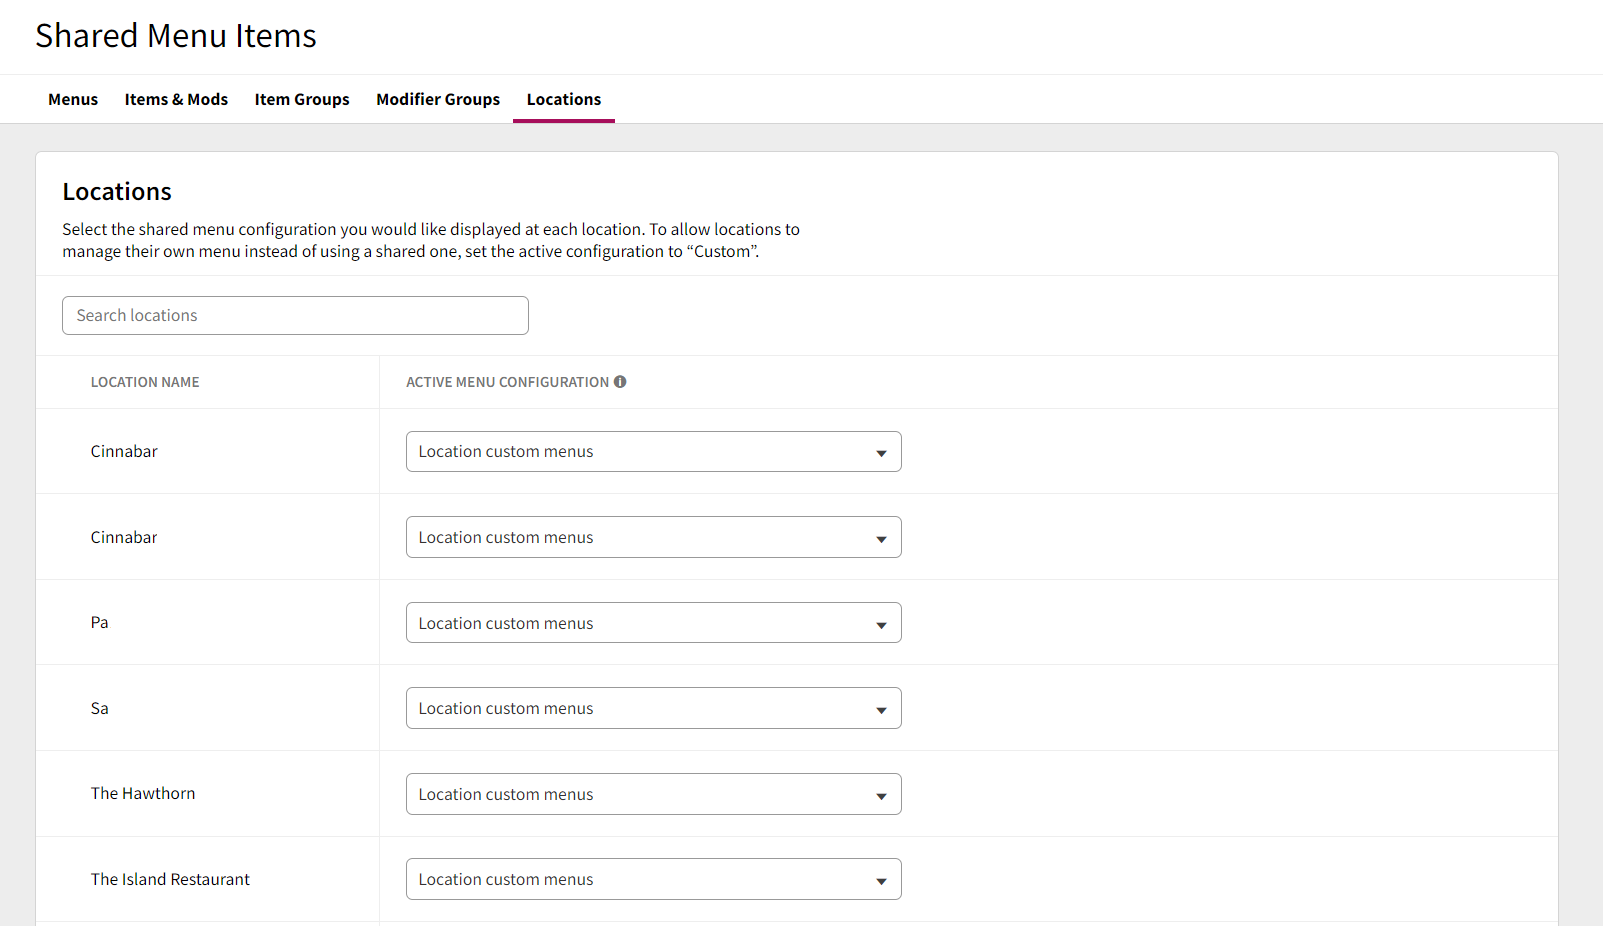 This will show all locations in the company. All locations will default to the "Location custom menu" which is the menu that is created for the location automatically.
When ready to go live with a new menu, using the "Active Menu Configuration" selector, select the new active menu configuration.
The menu displayed to guests on the mobile app will now be the selected menu!
For additional information, see the extended guides: